Lunar Photography: Capture Stunning Moon Photos Tonight
Refined lunar acquisition represents the baseline protocol for high-cadence astronomical imaging. Due to its significant albedo and relative proximity, the Moon allows for sub-millisecond signal capture and precision topographic mapping from any terrestrial coordinate. This technical framework outlines the requisite hardware logic and stacking algorithms for transitioning from basic optical observation to research-grade lunar cartography.
DH Research Lab
Data & Editorial Board
Expert Tested Gear & Affiliate Disclosure
This guide contains affiliate links. As an Amazon Associate, we earn from qualifying purchases.
01Why the Moon is the Perfect Starting Point
Unlike deep-sky photography, lunar imaging rewards you immediately:
Advantages of lunar photography:
- Bright enough for any camera, any location
- No tracking required for basic shots
- Visible details even at low magnification
- Changes appearance nightly (phases, libration)
- Can photograph in light-polluted cities
- Results within minutes, not hours
What you can capture:
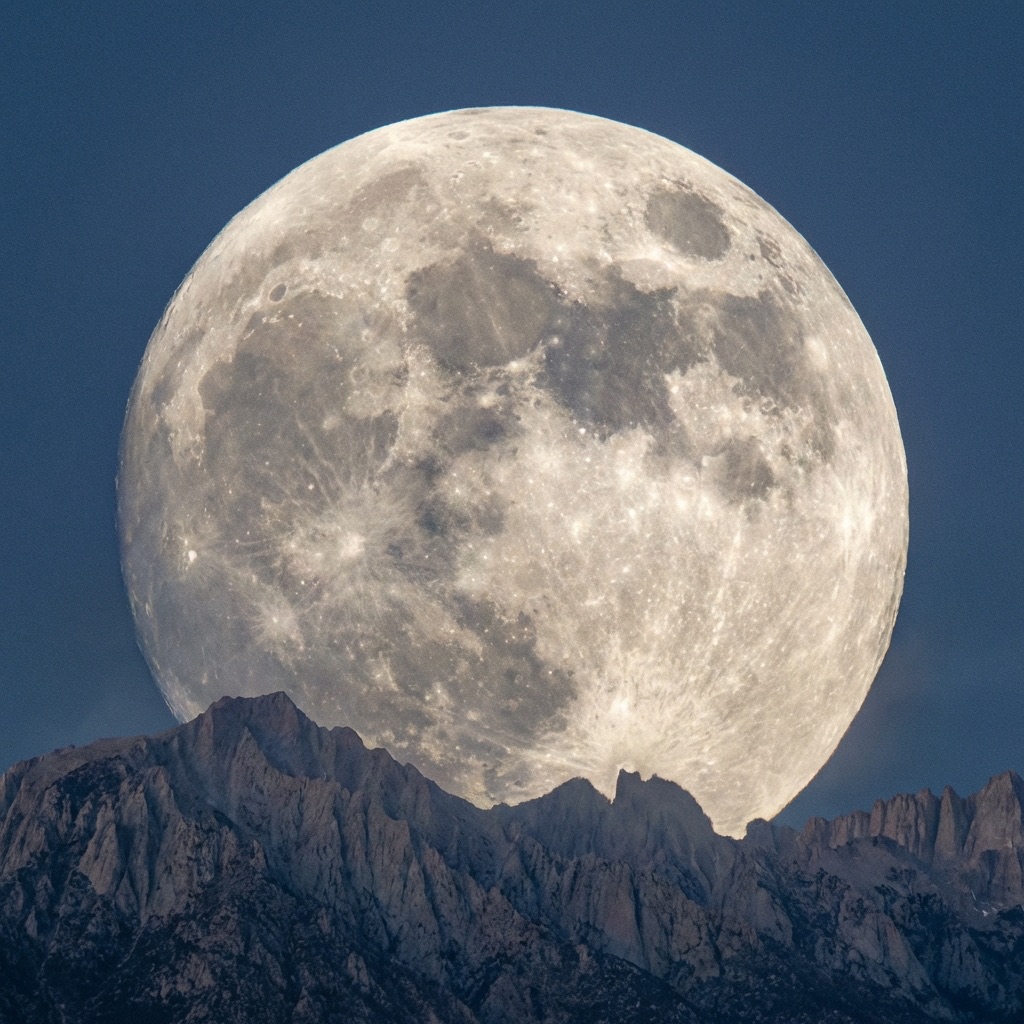
- Craters (thousands of them!)
- Mountain ranges and valleys
- Mare (dark "seas")
- Rays from impact craters
- Earthshine (during crescent phases)
- Lunar eclipses
The Moon never gets boring. High-resolution imaging reveals new details every session. And during eclipses? Pure magic.
Best Phase for Detail
02Equipment Options
You can photograph the Moon with almost anything:
Phone + Telescope:
- Use adapter to mount phone to eyepiece
- Great for quick shots and social sharing
- Limited resolution but impressive results
DSLR/Mirrorless + Telephoto:
- 200-600mm lens captures the whole Moon with detail
- Easy to set up, no telescope required
- Excellent for eclipses and conjunctions
DSLR/Mirrorless + Telescope:
- Maximum detail and resolution
- Requires T-ring adapter
- Can capture individual craters in stunning detail
Dedicated Planetary Camera:
- High frame rate (hundreds of FPS)
- Designed for video stacking
- Best possible resolution
- Steeper learning curve
ZWO ASI462MC Planetary Camera
“High-speed color camera optimized for lunar and planetary imaging.”
RATIONALE
The gold standard for beginners getting serious about lunar/planetary work. Pairs perfectly with 6-8" telescopes.
03Camera Settings for the Moon
The Moon is MUCH brighter than you'd think. Settings that work for stars will massively overexpose the Moon.
For DSLR/Mirrorless:
- Mode: Manual
- ISO: 100-400 (low for clean images)
- Shutter: 1/125 to 1/1000 sec
- Aperture: f/8-f/11 for lens, telescope is fixed
- Focus: Manual, live view zoomed 10x
For Phone:
- Tap on Moon to lock focus/exposure
- Reduce exposure compensation (-1 to -2 EV)
- Use pro/manual mode if available
- Shoot RAW if possible
For Planetary Camera:
- Gain: Low to medium
- Exposure: 5-50ms per frame
- Capture 1000+ frames at high FPS
- Stack in software (AutoStakkert, PIPP)
The Sunny 16 Rule Works: Oddly, the Moon is lit by the same sunlight you'd photograph a daytime landscape with. f/16, ISO 100, 1/125 sec is a good starting point.
Bright Target
Use daylight-like settings: low ISO, fast shutter.
Shoot RAW
More latitude for adjusting brightness.
Live View Focus
Zoom in 10x and focus on a crater rim.
04Focusing Techniques
Critical focus is what separates amateur snapshots from stunning images.
The Challenge: At high magnification, atmospheric turbulence ("seeing") makes the image shimmer. Even when you think you're focused, the next moment might be sharper.
Bahtinov Mask: A precision mask placed over your telescope creates diffraction spikes. When they perfectly intersect, you're in focus. Essential for DSLR work.
Live View Method:
- Point at Moon's terminator
- Zoom live view to maximum
- Focus until crater rims are sharpest
- Wait for moments of still air
- Take multiple shots and keep the sharpest
Video Method (Best for Planetary Camera): Record 30-60 seconds of video. Software will automatically select and stack the sharpest frames. This beats lucky imaging with single shots.
Pro tip: Temperature changes shift focus. Re-check every 15-20 minutes as equipment cools down.
Seeing Matters
05Stacking for Sharp Results
The secret to ultra-sharp lunar images? Video stacking.
The Process:
- Record 30-60 second video at high frame rate
- Import video into stacking software
- Software analyzes each frame for sharpness
- Best 10-20% of frames are aligned and averaged
- Result: Sharp image averaging out atmospheric blur
Recommended Software:
- PIPP — Pre-processing (centering, cropping)
- AutoStakkert — Frame selection and stacking
- Registax — Wavelet sharpening (the magic step)
Typical Workflow:
Video (2000 frames) → PIPP → AutoStakkert (stack 200 best) → Registax (sharpen) → Photoshop (final polish)
Why it Works: Atmospheric turbulence is random. In any 60-second video, a few hundred frames will have near-perfect stillness. Stacking averages these, dramatically improving resolution.
Bahtinov Focus Mask (various sizes)
“Precision focusing tool that shows exact focus point via diffraction spikes.”
RATIONALE
Eliminates focus guesswork. One of my most-used accessories for lunar and planetary imaging.
06Moon Phases and What to Shoot
The Moon's appearance changes throughout its cycle. Here's what works best when:
Waxing Crescent (2-3 days after New):
- Earthshine illuminates dark portion
- Great for artistic shots with foreground
- Look for Aristarchus crater
First Quarter (7 days):
- Terminator crosses amazing terrain
- Theophilus, Cyrillus, and Catharina craters
- Apennine Mountains dramatic
Waxing Gibbous (8-13 days):
- Tycho's rays visible
- Copernicus crater stunning
- Sinus Iridum "Bay of Rainbows"
Full Moon (14-15 days):
- Ray systems most visible
- Tycho and Copernicus dominant
- Surface features flattened (less interesting for detail)
- Best for eclipses!
Waning phases:
- Same features lit from opposite direction
- Different shadow angles reveal new details
Check moon phase and rise/set times on our Dashboard.
07Mosaics and High-Resolution Projects
At high magnification, the full Moon won't fit in one frame. Solution: Mosaics.
The Process:
- Plan overlapping panels (25% overlap minimum)
- Capture each panel as video, stack individually
- Assemble in stitching software
- Result: Ultra-high-resolution full-disk image
Software for Stitching:
- Microsoft ICE — Free, easy, handles most cases
- Photoshop Photomerge — Works well with pre-processed stacks
- Astro Pixel Processor — Designed for astrophotography
Panel Planning:
- 3x3 grid covers full Moon with typical setup
- 6x6 grid for ultra-high resolution
- Work systematically: rows, columns
- Overlap generously in case of drift
My Best Results: 4x4 mosaic using 6" refractor, ZWO ASI290MM, 2x Barlow. Result: 150-megapixel image showing craters down to 1km diameter. Printed 3 feet wide, it's jaw-dropping.
Stitching Challenges
08Tonight's Challenge
Ready to shoot the Moon? Here's your quick-start checklist:
Before You Go Out:
- Check moon phase on our Dashboard
- Verify clear skies and good seeing
- Charge batteries (camera and phone)
- Set up equipment during daylight if possible
Camera Quick Settings:
- ISO 100-200
- Shutter 1/250 second (adjust to avoid blowing highlights)
- Manual focus via live view
Targets by Phase:
- Quarter: Terminator craters
- Gibbous: Tycho rays
- Full: Ray systems, artistic wide shots
- Crescent: Earthshine!
Post-Processing:
- Increase local contrast
- Apply subtle sharpening
- Adjust white balance (Moon should be neutral, not orange)
- Crop to emphasize interesting features
The Moon rewards effort immediately. Every clear night, there's something new to capture. Get out there and shoot! 🌙
Frequently Asked Questions
Q:What camera settings for photographing the Moon?
Use ISO 100-200, shutter speed 1/125 to 1/500 second, and manual focus. The Moon is lit by direct sunlight so it's much brighter than you'd expect. The 'Sunny 16' rule applies: f/16, ISO 100, 1/125 second is a good starting point.
Q:What is the best phase of the Moon to photograph?
Quarter phases (first and third quarter) show the most surface detail because the terminator (shadow line) creates dramatic craters with long shadows. Full moon appears flat with less visible detail, though ray systems around Tycho and Copernicus are most visible.
Q:What lens do I need to photograph the Moon?
A 200-600mm telephoto lens captures the full Moon with good detail. For close-ups of individual craters, use a telescope with a camera adapter. Even a 70-300mm kit lens can produce impressive results.
Q:Why are my Moon photos blurry?
Common causes: camera shake (use tripod and remote shutter), atmospheric turbulence (wait for steady 'seeing'), poor focus (use live view at 10x magnification and focus on crater rims), or too slow shutter speed for hand-held shots.
Q:What is video stacking for lunar photography?
Record 30-60 seconds of video at high frame rate, then use software like AutoStakkert to select and stack the sharpest 10-20% of frames. This averages out atmospheric turbulence, producing dramatically sharper images than single shots.
Don't waste a clear-night chance
Get the field checklist, then use DarkestHour to decide if tonight's sky is actually worth your time, setup or travel.
Learn first. Decide with the map.
DarkestHour guides are free trust builders. Use them to understand conditions, then use Pro for saved spots, alerts and best-night decisions.
Find Your Darkest Sky
Use our real-time satellite maps to find locations with zero light pollution.
Launch Interactive MapYour Learning Roadmap
You've mastered the beginner basics. The next logical step in your technical progression is mastering intermediate acquisition.
MANDATORY FIELD EQUIPMENT
Celestron NexStar 8SE
The gold standard for deep-sky observation. 203mm aperture for maximum light gathering.
ZWO Seestar S50
Fully robotic imaging system. Perfect for urban environments and rapid deployment.
Peak Design Travel Tripod
Zero-latency stability for long exposure astrophotography. Carbon fiber construction.
Continue Your Research
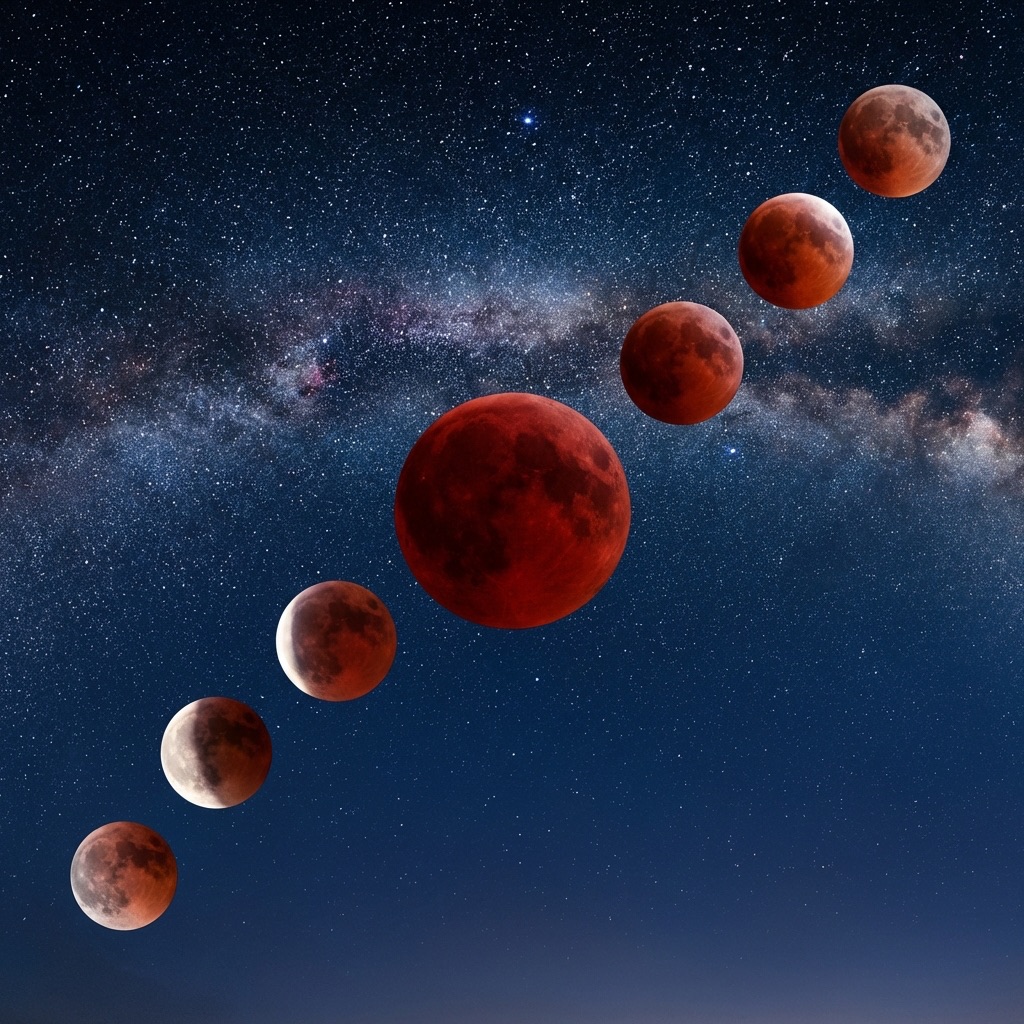
Total Lunar Eclipse March 2026: Blood Moon Guide
The last Blood Moon until 2028! Complete guide to the March 2026 total lunar eclipse with viewing times, photography settings, and essential gear picks.
Best Beginner Astronomy Gear: Your First Telescope Setup
A complete guide to your first telescope setup: expert recommendations for Dobsonians, essential eyepieces, and navigation aids for beginners.
Meteor Shower Calendar 2026: Don't Miss These Events
Your complete guide to every major meteor shower in 2026. Find peak dates, hourly rates (ZHR), and expert photography tips for each event.
End of Dossier • Research Complete